En este tutorial se explicará cómo funcionan y de qué forma podemos implementar las notificaciones en Android. Para esta prueba de concepto tenemos el código en Github y una app en Google Play, a continuación podemos encontrarlos en:

![]()
Notificaciones expandibles y normales
Jelly Bean fue la primera versión de Android que consiguió dar soporte a este tipo de notificaciones en Android, ahora podemos crear notificaciones con imágenes de mayor tamaño, textos con más caracteres y hasta incluso con vistas customizadas. Antes de poder utilizarlas necesitamos sabes un par de cosas. ¡Vamos a ello!
¿Qué es NotificationManager?
Las notificaciones en Android se crean a partir de el NotificationManager. Antes de poder utilizarlo primero necesitas declarar una instancia y pasarle el contexto de tu aplicación.
private static NotificationManager mNotificationManager;

mNotificationManager = (NotificationManager) getSystemService(Context.NOTIFICATION_SERVICE);
Builder classes
La clase Notification.Builder fue añadida en Android 3.0 Honeycomb [API Level 11]. Así que si necesitas dar soporte a versiones anteriores deberías usar NotificationCompact en su lugar.
La clase NotificationCompat.Builder se encuentra en la librería de support v4 compatible con versiones 1.6 y superiores.
Ambos builders proveen una interfaz que es usada para crear Notificaciones. Tienes que usar un PendingIntent para especificar qué hacer cuando el usuario pulsa sobre la notificación o las acciones dentro de ella como es el caso de Gmail. La forma de añadir acciones dentro de una notificación se hace de la siguiente forma:
// - Crear un PendingIntent
  Intent resultIntentAction1 = new Intent(this, ActionsActivity.class);
  resultIntentAction1.setAction("Action 1");

        PendingIntent resultPendingIntentAction1 =
                PendingIntent.getActivity(
                this,
                0,
                resultIntentAction1,
                PendingIntent.FLAG_UPDATE_CURRENT
            );

// - Crear la Notificación
  new NotificationCompat.Builder(this)
                .setSmallIcon(R.drawable.ic_launcher)
                .setAutoCancel(true)
                .setLargeIcon(remote_picture)
// - Establece el PendingIntent que se llamará cuando se pulse sobre la notificación
                .setContentIntent(resultPendingIntent)
// - Establece el PendingIntent que se llamará cuando se pulse sobre la acción 1
                .addAction(R.drawable.ic_launcher, getResources().getString(R.string.notification_normal_with_actions_action_one), resultPendingIntentAction1)
                .addAction(R.drawable.ic_launcher, getResources().getString(R.string.notification_normal_with_actions_action_two), resultPendingIntentAction2)
// - Establece el título del texto
            .setContentTitle(getResources().getString(R.string.notification_normal_with_actions_title_normal))
// - Establece el texto principal
             .setContentText(getResources().getString(R.string.notification_normal_with_actions_content_normal)).build();
Notification views
La vista normal (no expandida) de las notificaciones tiene un tamaño de 64dp. Cuando se expanden aparecen más elementos. A continuación detallaremos los elementos más destacados que podemos encontrarnos en una notificación:
- Título del contenido.
- Icono de mayor tamaño.
- Texto del contenido.
- Icono pequeño
- TimeStamp de la notificación.
- Vista de gran tamaño. Esta vista solo es visible cuando la notificación está expandida. Esto se produce cuando la notificación está en el top o cuando el usuario expande la notificación por el mismo. La forma de poder modificar el contenido de esta vista es mediante el Notification.Style añadidas a partir de la versión 4.1 de Android (API Level 16).
- La vista normal. Está compuesta por un icono pequeño, un título y un texto de detalle.
Vista de gran tamaño
Como hemos comentado antes, para poder modificar esta vista necesitas configurar el Notification.Style. A continuación se detallará los tipos que hay y sobre todo, un ejemplo de cómo implementarlos:
- BigTextStyle. Muestra un bloque de texto grande con el fin de dar más información al usuario sobre el contenido de la notificación.
- BigPictureStyle. Muestra un bitmap de 256 dp de tamaño.
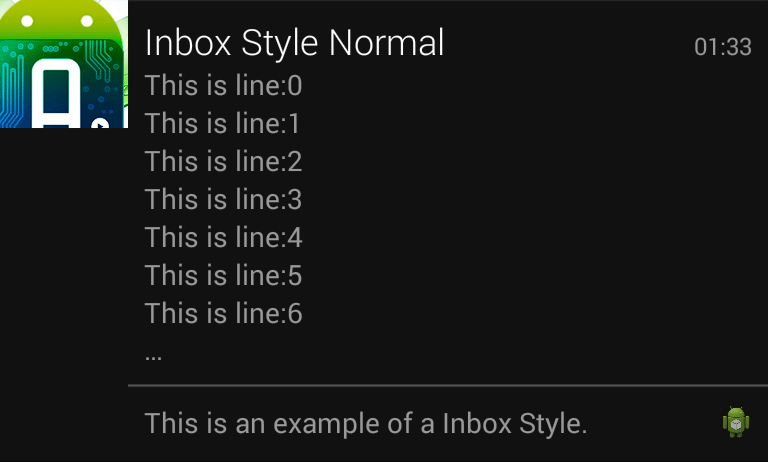
- InboxStyle. Muestra líneas de forma similar a un ListView, es por ejemplo lo que utiliza WhatsApp para sus notificaciones.
Vamos a lo más importante, el código:
  Bitmap picture = null;

  // - Creamos el estilo de la notificación, en este caso es de tipo Big Picture
  NotificationCompat.BigPictureStyle notiStyle = new NotificationCompat.BigPictureStyle();
  notiStyle.setBigContentTitle(getResources().getString(R.string.notification_big_picture_title_expanded));
  notiStyle.setSummaryText(getResources().getString(R.string.notification_big_picture_summary_expanded));

  try {
     picture = BitmapFactory.decodeStream((InputStream) new   URL(NotificationsConstants.URL_IMAGE).getContent());
   } catch (IOException e) {
      e.printStackTrace();
   }

   // - Añadimos la imagen descargada al estilo
   notiStyle.bigPicture(picture);

   Intent resultIntent = new Intent(this, MainActivity.class);

   PendingIntent resultPendingIntent =
      PendingIntent.getActivity(
      this,
      0,
      resultIntent,
      PendingIntent.FLAG_UPDATE_CURRENT);

   return new NotificationCompat.Builder(this)
                .setSmallIcon(R.drawable.ic_launcher)
                .setAutoCancel(true)
                .setLargeIcon(picture)
                .setContentIntent(resultPendingIntent)
                .setContentTitle(getResources().getString(R.string.notification_big_picture_title_normal))
                .setContentText(getResources().getString(R.string.notification_big_picture_content_normal))
// - Seteamos el estilo de la notificación
                .setStyle(notiStyle).build();

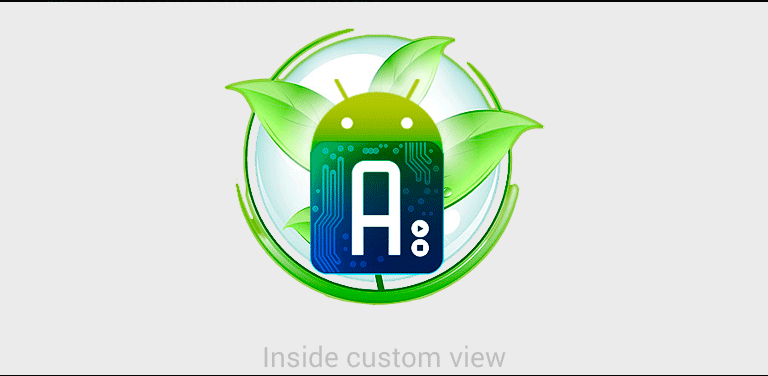
Notificaciones con Vistas Customizadas
  Intent resultIntent = new Intent(this, MainActivity.class);

  // - Creamos el PendingIntent para que cuando se pulse en la notificación se haga una acción
  PendingIntent resultPendingIntent =
            PendingIntent.getActivity(
            this,
            0,
            resultIntent,
            PendingIntent.FLAG_UPDATE_CURRENT
        );

  // Creamos el remote view y seteamos el bigContentView
  RemoteViews expandedView = new RemoteViews(this.getPackageName(), R.layout.notification_custom_view);
  expandedView.setTextViewText(R.id.text_view, getResources().getString(R.string.notification_custom_view_inside));

  Notification notification = new NotificationCompat.Builder(this)
                .setSmallIcon(R.drawable.ic_launcher)
                .setAutoCancel(true)
                .setContentIntent(resultPendingIntent)
         .setContentTitle(getResources().getString(R.string.notification_custom_view_title_normal)).build();

 if(android.os.Build.VERSION.SDK_INT >= 16)
   notification.bigContentView = expandedView;
 else
   Toast.makeText(MainActivity.this, getResources().getString(R.string.notification_custom_view_toast), Toast.LENGTH_SHORT).show();
Después de todo esto ya podremos crear todo tipos de notificaciones en Android.
Gracias y espero que sirva de ayuda.